OS/X tips for the lost, stolen, or broken

Backup, BACKUP, BACKUP!!!

In all three cases your first line of defense is a good backup.  If you do not have multiple backups then you are an idiot and deserve to lose your data.  You obviously don’t need it.

I use Time Machine for my local backup and BackBlaze for my off-site backup. However both are limited to just my stuff. Data backups are great, if you have the time to spend an afternoon (or an entire day, or weeks, if off-site) to rebuild your machine from scratch.  But if you have to get up and running ASAP whether it be from theft or crashed storage, then you need a mirrored system drive.

I use Carbon Copy Cloner. It’s free, easy, and has a lot of features; the most critical feature is that you can create a mirrored system drive and boot from it. To boot your backup: power on, quickly press and hold the “option” key and wait for the Startup Manager, then arrow to select your external volume and press “return”.  My HD failed six months ago. And if I didn’t have a mirror copy of my HD, then I would have lost a lot of time.  It’s not always convenient to run to the Apple store when you have a problem.  I booted my CCC drive so that I could get back to work and then repaired it about a week later when it was convenient for me.

Get an external USB-powered backup drive.  They are cheap, small, and can save you a lot of time.

If found, please, I beg you, return to…

In 2004, while working in Tokyo, I invited my wife and daughter to visit me for a family vacation.  My kid was 13 at the time, and being raised on Miyazaki films and Japanese anime, this was going to be the trip of a her 13-year lifetime.  She saved, and saved, and saved, and then before she left the US, she converted her stash to Yen–this was going to be the best trip ever!

On the train from the Narita airport to Tokyo Station she lost her wallet.  She was devastated.  But we had hope.  Tokyo is quite possible the most honest city in the world (IMHO).  The next day we went to the nearest rail station and gave a description of the wallet and its contents.  The operator entered the information into a terminal and a second later said that it had be found and could be retrieved just a few station hops away.  Amazing!

Putting contact information on personal items is not a new concept, and you have nothing to lose by doing it, except if you are an Apple user and are obsessed with your shiny precious Mac and do not want it labeled, marked, or blemished in any way.

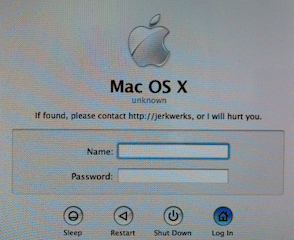
For you crazy Mac users there is an option.  Put your contact information on the login screen. Just pop open a terminal and type (on a single line):

defaults write /Library/Preferences/com.apple.loginwindow
LoginwindowText -string
"If found, please, I beg you, return to..., or die in hell!!!"

And then pray, that if you misplace your Mac, that some helpful terminal operator will show you where it is.

What!  You do not have a login screen?I?I Read on…


Passwords, PASSWORDS, PASSWORDS!!!

I am amazed at the number of Mac users that do not password protect their stuff.  You have only yourself to blame if your data gets misused.  Set strong passwords to protect your Mac and your data, and if it is not too inconvenient, encrypt.  Many do not encrypt and I do not blame them.  E.g., Time Machine does not work well with encrypted volumes.  A good in-between solution is to create an encrypted volume as a file on your drive for your most sensitive stuff.

If you haven’t already, assign yourself a password.  Open System Preferences, then Accounts, then find your account and assign yourself a password.  Then click on Login Options and set Automatic login to Off.

A login screen is a good start. But, there is more you can do. Anyone with physical access to your Mac can boot with command-S and have root access to your machine (no passwords needed).  This is actually something that I will use in a future post to show how to get a used Mac ready to sell.

One way to protect from this type of attack is to setup a firmware password.  To do this you will need your original installation media.  Here we go:

  1. Insert your installation media.
  2. Shutdown your Mac.
  3. Power on, and quickly press and hold the “option” key.
  4. In a few seconds you should be greeted by the Startup Manager:
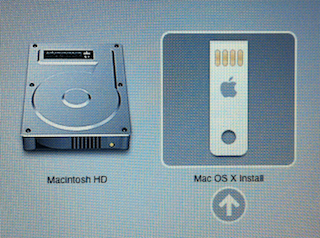
  5. Arrow over to your installation media and press enter.
  6. Next you will be greeted by the OS/X Installer.  Go to the menu bar and select Utilities then Firmware Password Utility:
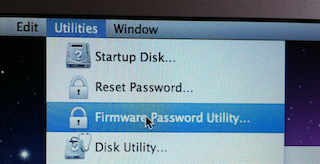
  7. Follow the prompts to setup your password.
  8. Exit the installer with command-Q.
  9. Remove your media and reboot.

Unlike other PCs that will prompt for the firmware password on boot, Macs will only prompt if any attempt is made to alter or use a firmware feature.  E.g. reboot your Mac and hold “option” again.  You will be greeted with:
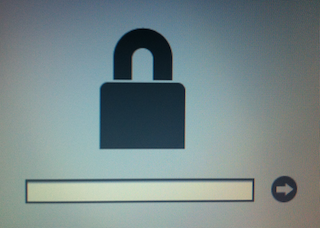
Just enter your firmware password and your Mac will continue to boot. BTW, don’t lose your firmware password.  If you forget or lose your firmware password, then you will need to visit the Apple store for help.

Unfortunately the firmware password does not project the internal drive if removed.  Most Macs are stolen for cash or personal use, but if you are paranoid enough to think that you will be the target of data theft, then encrypt.

Summary

The aforementioned three tips are just a few examples that I use.  You can Google for many more OS/X security and privacy tips. Be safe.

A few OS/X apps to save & make time

Jumpcut

“Jumpcut is an application that provides “clipboard buffering” — that is, access to text that you’ve cut or copied, even if you’ve subsequently cut or copied something else. The goal of Jumpcut’s interface is to provide quick, natural, intuitive access to your clipboard’s history.” — Jumpcut website

Jumpcut is a huge time saver for me (every microsecond counts :-).  Although I have a 27″ display, and can put applications side-by-side, it is still quicker to select, command-C; select, command-C; etc… to get all the various bits of content I need to copy all at once.  Unfortunately Jumpcut does not have a stack that pops as you point, command-V; point, command-V; etc…  IOW, command-V will behave as expected.  To access your buffered clips you will have to use the Jumpcut icon in the menu bar and then select from the drop down the clip you need.  The instant your clip is selected it will be pasted, so position your pointer first.


Source: http://home.cc.umanitoba.ca/~psgendb /local/public_html/setup.jds/desktop.html

MiddleClick

Most OS/X users don’t use the command line; the ones that do probably use Terminal or something similar.  What’s left are the old UNIX users like myself that use X11 xterms.  In an xterm, if you want to select a bit of text you can select it the same way you would expect to select text within any GUI environment.  However there is also the option to left click to mark the start, and then right click to mark the end.  But to paste, you need that middle click.

OS/X does provide the “middle click” via option-left-click.  However if you are a UNIX console jockey, you expect to copy and paste with just a mouse.

MiddleClick is a small utility that allows a three-finger tap or click to be registered as the middle mouse button.  There are other utilities that export custom mouse events, but not all of them worked with X11.  Finally, one handed copy and paste.


App Tamer

Firefox and Safari suck the life out of my battery. I’ll take the blame for having 50 Firefox tabs open and allowing Flash to run in Safari.  Given that most content and many of my apps are delivered via a browser, then it makes sense to just leave them open.  The problem is that they take up about 20-30% of the CPU.  Firefox is the worse.  As I write this Firefox is consuming 31% of my CPU with no Flash content running (blocked).

Other apps are fine.  I have Photoshope CS5, Microsoft Office 2011, Adium, Skype, Twitter, and a bunch of other apps that I leave running all the time, and they are all well behaved.  As for the misbehaving, I use App Tamer.

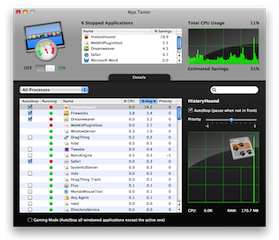
App Tamer will automatically suspend all applications in its list sans the focused (foreground) app.  Alternatively I could kill -18 the process ID to get the same effect, but I prefer to be lazy and let App Tamer handle it automatically.  App Tamer is also smart enough to not suspend a browser with a download in-flight.  Suspended apps are dimmed; to unsuspend, just click on the app.

Ask me now, how is your battery life? Well, it is measurably longer.  With my old Pro without App Tamer (or kill -18), I could not make it from the US East to West coast on a single charge.  Now I can.  And if you have read the reports of Flash sucking the life out of the new Airs, then rest easy, App Tamer fixes that too (unless you really are looking at all that Flash content).  Increase battery life is how App Tamer will help you make time.  $15.  Free trial.

Quick Tip: DVD screen capture with OS/X

My screen is my business. Or so I thought.

The Problem: Apparently you cannot use any of the standard OS/X screen capture apps, command line tools, or hot keys to capture a frame from a DVD using iDVD. As illustrated, you just get the dreaded checkerboard of no content.

The Solution: Don’t use iDVD. Use VLC. It’s simple, just launch VLC, Open Disc…, press the space bar to pause, use the slider to find the scene, then press ‘e’ to skip frame-by-frame until you find your frame. Then snap away. You can use the built-in VLC video snapshot function (Command-Opt-S) or any other snapshot utility you like. Windows and Linux users can do the same with VLC.

Millennium Trilogy film review with meatballs

If you are looking for an objective review of the Swedish film adaptation of Stieg Larsson’s Millennium series; The Girl with the Dragon Tattoo, The Girl Who Played with Fire and The Girl Who Kicked the Hornets’ Nest; then keep looking, you will not find it here. Why? Well, unlike politicians where you have to pick the ones that suck the least, movies for me are the opposite.  I like all of them.  With one exception, Eraserhead (another story for another time).

My wife and I made the approximately 7.5 hour investment this weekend, complete with subtitles.  In a sense, I have read The Girl with the Dragon Tattoo :-)  What did I think? I thought they were awesome.  They had everything I like in a movie; European cities, mystery, realistic action, great acting, and Macs.

We watched the first two movies as iTunes rentals streamed from my wife’s laptop to our Apple TV.  The third I rented as a Blu-ray from Blockbuster after Apple TV failed to stream when we tried to rent it directly from Apple TV (Google for “slow apple tv”)–but that’s another story.  The Blu-ray rental (unlike the iTunes rental) had the option for dubbed audio instead of subtitles.  I am not a fan of dubbed audio, and I was really starting to learn a few Swedish four letter words–we finished the third with subtitles as well.

The Problem with Subtitles

The problem with subtitles is, that you cannot look away from the screen, not even for an instant with this type of movie.  But I’ll give you a hint that may be unique to this trilogy; just in case you get lost in the story.  All of the good guys use Macs and the bad guys don’t.  I’ve never seen so much airtime for any Apple product in a movie (that I recall).  The film’s leading female and male characters (a hacker and a journalist respectively) both sport, throughout the series, circa 2007 MacBook Pros.  You’d think Apple would have made the series a streaming priority (still pissed, but I’ll move on).

My advice.  See the movies, and read the subtitles.  And then tell me if the Swedish word for shit is really fuck.  Because that is what it sounded like in the movie.

Meatballs

I cannot watch a Swedish film without thinking of Swedish meatballs.  I love Swedish meatballs.

If you are ever in New York, then please visit my favorite meatball joint, Aquavit.  It’s not cheap, but very very good.

Don’t waste your time with the restaurant, just eat in their more casual bistro (off to the left as you enter).


Aquavit
65 East 55th Street
New York, NY 10022
+1 212-307-7311
info@aquavit.org

Finally, Apple II and IIgs warez on your iPad

Updated: November 26 2012 (does not work with iOS6!)
See updates at the end.


Running 1985 Code on a 2010 Device

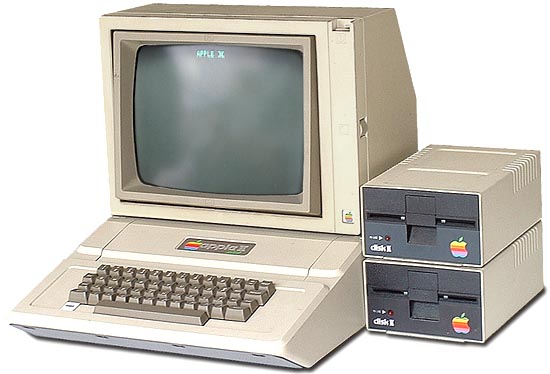
I had an awesome childhood; a big part of that was computers, specifically my Apple II+.  Ah, the memories…

Sadly I do not have my original Apple II+ (clone). Nor do I recall the name of the manufacture. C’est la vie.

Well now I can relive all my “memories” on my iPhone and iPad.  But it’s going to take a bit of work, and I am going to need some stuff:

  1. My “memories”, i.e. my original Apple II+ floppies from high school.
  2. An Apple II computer with floppy drive and a serial port.
  3. A null-modem serial cable to connect my Apple II to my Mac.
  4. ADTpro Apple II to Mac transfer software.
  5. ActiveGS – Best Of FTA iOS app from the App Store.  This is an Apple IIgs emulator capable of running most Apple II, II+, IIe, and IIgs warez.
  6. A text editor to edit the list of images in ActiveGS.
  7. Something to create ActiveGS icons. (optional)
  8. iExplorer, to get my stuff into ActiveGS.

Memories

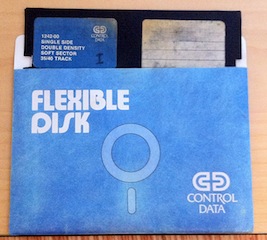
After a bit of digging I found my very first floppy disk.  I should probably have it framed, like others do with their first dollar.  Hopefully it still works.


Hardware

This is the hard (pun intended) part.  You are going to need a real Apple II or know someone that has one.  Your best bet is an Apple //c.  They are self-contained (floppy drive and serial port) and are easy to find.  As I write this there are many on eBay and at least one listed in the local classifieds.  To connect your Apple //c to your computer (MacBook Air in my case) you are going to need a serial cable and a USB to serial adapter.  I opted to purchased my cable (call me lazy) from http://retrofloppy.com/products.html#DIN5DE9.  I had an existing USB to serial adapter from Keyspan that works just fine.


Liberating Your Warez

ADTpro (http://adtpro.sourceforge.net/) is a very well maintained Apple II floppy disk to floppy image (and v.v.) utility and is very easy to use.  Just follow the instructions from their site and in a few minutes you will have liberated your first floppy disk.  (It is very cool to see ADTpro boot your Apple //c from the serial port.)


ActiveGS

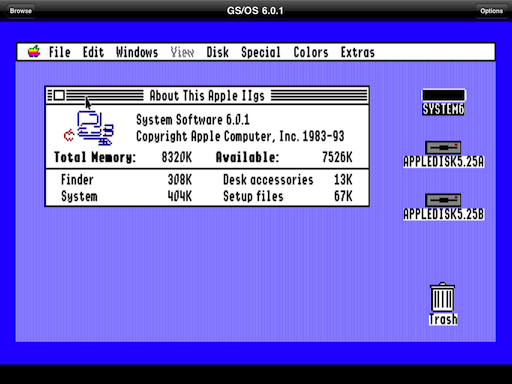
ActiveGS is an Apple IIgs emulator and is available for most platforms as a standalone app and as a browser plug-in.  Recently (Feb 24th) an iOS ActiveGS app was published and is available via the App Store.  However, I do not think it will last very long…

iDOS (based on DOSBox) is very similar to ActiveGS, but for DOS programs.  After a rocky start iDOS finally made it to the App Store just to be removed because users could add their own binary content to iDOS.  That was the point of iDOS to begin with.  To get back online iDOS had to come with preloaded apps and remove the ability to add content via iTunes File Sharing.  But it didn’t take long for users to figure out that by using iExplorer content could be added.  This same “trick” needs to utilized to add content to ActiveGS.  In time, this will be the undoing of ActiveGS.


Inserting content to ActiveGS

Download, install, and launch iExplorer (NOTE: If you have problems with iExplorer, then use DiskAid).   Connect up your iOS device and then find the Best of FTA/Documents directory. This is where you will place all your disk images as well as any thumbnails and/or screen shots. Note: Do not place your images, thumbnails, or screen shots in the Best of FTA/Best of FTA.app directory, unless you want them read-only and lost on iPad/iPhone restore.


To add a disk image, just drag-and-drop an Apple II or IIgs disk image into that directory along with any thumbnails and screen shots (NOTE: iExplorer will only drop a single file, IOW, do not multi-select; drag one at a time). Next, you will need to define your image to ActiveGS. This needs to be done in the Best of FTA/Best of FTA.app directory.


Copy the list.activesxml file to your computer, then open it up with your favorite text editor and add a section for your image, e.g.:


<config version="2" id="my0a">
        <name>High School Classics</name>
        <year>1984</year>
        <publisher>Me</publisher>
        <desc><![CDATA[
        Midlife Crisis Classics!
        ]]></desc>
        <pic type="thumbnail" width="64" height="40">../Documents/dos33-0.png</pic>
        <format>APPLE2</format>
        <image slot="6" disk="1">../Documents/my0a.dsk</image>
        <pic type="screenshot" width="320" height="240">../Documents/dos33-1.png</pic>
        <bootslot>6</bootslot>
</config>

It should be obvious where to place your new config section.  Review the file for other examples.  After you have made your changes drag lists.activesxml back to your iOS device.  You should also create a 64×40 pixel image for the icon and drag that there too. You’re done!

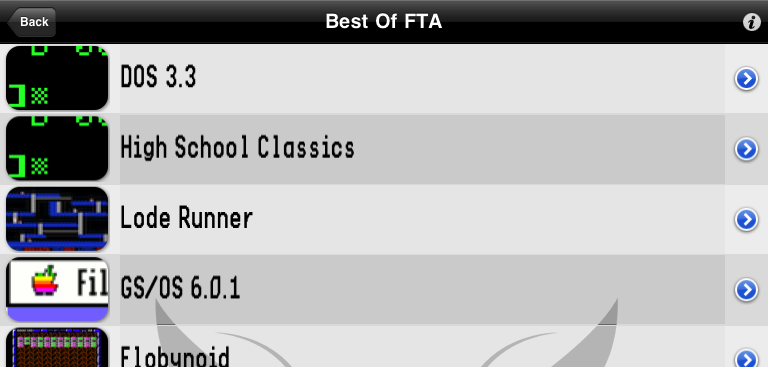
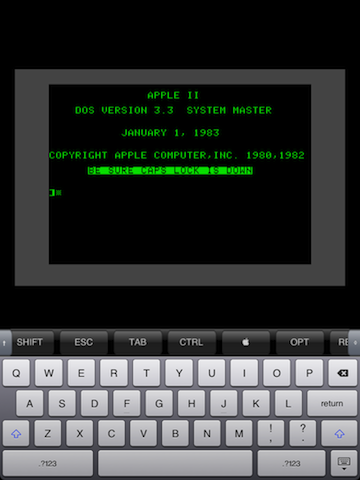
You will need to kill (double click the home button, find ActiveGS, and press the minus (-) sign) and restart ActiveGS on your iOS device for the changes to take effect. Hopefully your new start-up screen will look something like this:


ActiveGS iPad Usability Tips

  • Swipe down to reveal the ActiveGS menu bar. The menu bar has a button to return back to the main menu on the left side, and a button on the right for various emulator options.
  • Swipe up to reveal the keyboard. Swipe up a 2nd time to get a 2 button gamepad.
  • Pinch to zoom the screen, however you cannot place the screen.
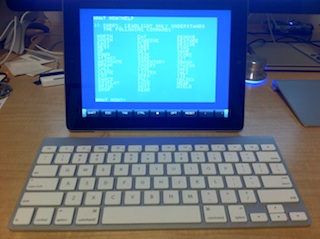
  • You can use a Bluetooth keyboard. However none of the modifier keys (including control) are mapped. This is a limitation of the Apple iOS SDK. To use the BT keyboard ActiveGS must be in keyboard mode (swipe up until you have just a row of modifier keys on the bottom).

    iPad 2 + BT Keyboard + ActiveGS = Apple IIcgs

  • The virtual joystick is difficult to use, practice, practice, practice…

Enjoy!


Credits

  1. Apple II+ Picture. oldcomputers.net

Update: March 2 2011, Multi-disk sets

I actually had two high school diskettes that I labeled I and II (I is in the photo above). Yielding a small pair of scissors, I cut a notch in both diskettes so that I could use the flip side (this was common practice in the ’80s to double your capacity). 27 years later, I’ve now imaged all 4 sides. Do I really need 4 different menu items? No. Just add multiple duplicate entries for each disk in your config, e.g.:

        <image slot="6" disk="1">../Documents/my0a.dsk</image>
        <image slot="6" disk="1">../Documents/my0b.dsk</image>
        <image slot="6" disk="1">../Documents/my1a.dsk</image>
        <image slot="6" disk="1">../Documents/my1b.dsk</image>

Then boot up. The first disk will boot. To change disks on the fly, swipe down to get the menu. In the upper right corner you’ll notice a floppy icon rotating on its Y-axis. Tap it and the next disk will be inserted. Keep taping to cycle through all your disks. Each tap action will summon a pop-up message with the name of the disk. Easy.


Update: March 15 2011, iOS 4.3 and iPad 2

No worries, iOS 4.3 on iPad I and 2 tested.


Update: April 6 2011, ActiveGS 1.22

ActiveGS 1.22 tested.


Update: April 11 2011, More config file tips and 1.22 corrections

For 144K Apple II disk images use slot 6 with an Apple2 format, e.g.:

    <format>APPLE2</format>
    <image slot="6" disk="1">../Documents/appleii.dsk</image>
    <bootslot>6</bootslot>

For 800K Apple IIgs disk images use slot 5 with a 2GS format, e.g.:

    <format>2GS</format>
    <image slot="5" disk="1">../Documents/SYSTEM6.2MG</image>
    <bootslot>5</bootslot>

For Apple IIgs HD images use slot 7 with a 2GS format, e.g.:

    <format>2GS</format>
    <image slot="7" disk="1">../Documents/c.2mg</image>
    <bootslot>7</bootslot>

Custom color config example:

    <bramparam>background:black;border:dark-gray;font:green</bramparam>

Thanks to Rich and John (see comments) for the tips.


Update: August 22 2011, More RAM

If you need more RAM (in MB), then add this to your config (e.g. 8 for 8 MB):

    <emulatorParam>_memorySize:8</emulatorParam>


Update: September 21 2011, DiskAid

Many Windows users are having problems with iExplorer and have reported that DiskAid is a good alternative.


Update: October 15 2011, iOS5

Mike has confirmed that iOS 5 is safe for ActiveGS and iExplorer. Apple II Forever!


Update: October 16 2011, iExplorer

Changed iPhone Explorer to iExplorer in document.


Update: November 26 2012, iOS6

This hack does not work with iOS6. The app directory is locked down. Jailbreaking is your only hope.