OS/X tips for the lost, stolen, or broken
 Backup, BACKUP, BACKUP!!!
In all three cases your first line of defense is a good backup. If you do not have multiple backups then you are an idiot and deserve to lose your data. You obviously don’t need it.
I use Time Machine for my local backup and BackBlaze for my off-site backup. However both are limited to just my stuff. Data backups are great, if you have the time to spend an afternoon (or an entire day, or weeks, if off-site) to rebuild your machine from scratch. But if you have to get up and running ASAP whether it be from theft or crashed storage, then you need a mirrored system drive.
I use Carbon Copy Cloner. It’s free, easy, and has a lot of features; the most critical feature is that you can create a mirrored system drive and boot from it. To boot your backup: power on, quickly press and hold the “option” key and wait for the Startup Manager, then arrow to select your external volume and press “return”. My HD failed six months ago. And if I didn’t have a mirror copy of my HD, then I would have lost a lot of time. It’s not always convenient to run to the Apple store when you have a problem. I booted my CCC drive so that I could get back to work and then repaired it about a week later when it was convenient for me.
Get an external USB-powered backup drive. They are cheap, small, and can save you a lot of time.
 If found, please, I beg you, return to…
In 2004, while working in Tokyo, I invited my wife and daughter to visit me for a family vacation. My kid was 13 at the time, and being raised on Miyazaki films and Japanese anime, this was going to be the trip of a her 13-year lifetime. She saved, and saved, and saved, and then before she left the US, she converted her stash to Yen–this was going to be the best trip ever!
On the train from the Narita airport to Tokyo Station she lost her wallet. She was devastated. But we had hope. Tokyo is quite possible the most honest city in the world (IMHO). The next day we went to the nearest rail station and gave a description of the wallet and its contents. The operator entered the information into a terminal and a second later said that it had be found and could be retrieved just a few station hops away. Amazing!
Putting contact information on personal items is not a new concept, and you have nothing to lose by doing it, except if you are an Apple user and are obsessed with your shiny precious Mac and do not want it labeled, marked, or blemished in any way.
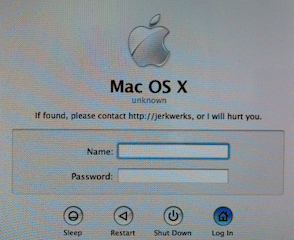
For you crazy Mac users there is an option. Put your contact information on the login screen. Just pop open a terminal and type (on a single line):
defaults write /Library/Preferences/com.apple.loginwindow
LoginwindowText -string
"If found, please, I beg you, return to..., or die in hell!!!"
And then pray, that if you misplace your Mac, that some helpful terminal operator will show you where it is.
What! You do not have a login screen?I?I Read on…
Passwords, PASSWORDS, PASSWORDS!!!
I am amazed at the number of Mac users that do not password protect their stuff. You have only yourself to blame if your data gets misused. Set strong passwords to protect your Mac and your data, and if it is not too inconvenient, encrypt. Many do not encrypt and I do not blame them. E.g., Time Machine does not work well with encrypted volumes. A good in-between solution is to create an encrypted volume as a file on your drive for your most sensitive stuff.
If you haven’t already, assign yourself a password. Open System Preferences, then Accounts, then find your account and assign yourself a password. Then click on Login Options and set Automatic login to Off.
A login screen is a good start. But, there is more you can do. Anyone with physical access to your Mac can boot with command-S and have root access to your machine (no passwords needed). This is actually something that I will use in a future post to show how to get a used Mac ready to sell.
One way to protect from this type of attack is to setup a firmware password. To do this you will need your original installation media. Here we go:
- Insert your installation media.
- Shutdown your Mac.
- Power on, and quickly press and hold the “option” key.
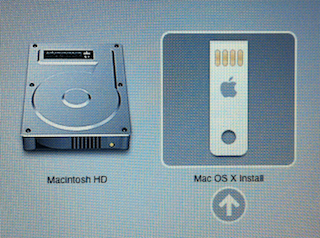
- In a few seconds you should be greeted by the Startup Manager:

- Arrow over to your installation media and press enter.
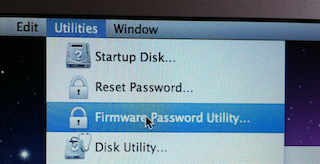
- Next you will be greeted by the OS/X Installer. Go to the menu bar and select Utilities then Firmware Password Utility:

- Follow the prompts to setup your password.
- Exit the installer with command-Q.
- Remove your media and reboot.
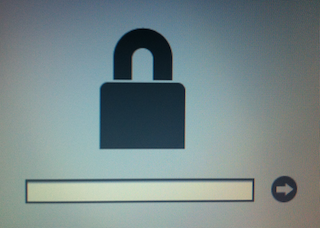
Unlike other PCs that will prompt for the firmware password on boot, Macs will only prompt if any attempt is made to alter or use a firmware feature. E.g. reboot your Mac and hold “option” again. You will be greeted with:

Just enter your firmware password and your Mac will continue to boot. BTW, don’t lose your firmware password. If you forget or lose your firmware password, then you will need to visit the Apple store for help.
Unfortunately the firmware password does not project the internal drive if removed. Most Macs are stolen for cash or personal use, but if you are paranoid enough to think that you will be the target of data theft, then encrypt.
Summary
The aforementioned three tips are just a few examples that I use. You can Google for many more OS/X security and privacy tips. Be safe.